MapsAlive lets you make any image interactive. Your “map” can be anything: a floor plan, diagram, photograph, drawing, or a stylized or historical geographic map. An interactive map can display photos and text, play videos or sound, and even draw routes between locations on the map.
Make any map interactive
You can make any kind of map image interactive with MapsAlive. Click on a sample below to see how an interactive map works.


You can make any JPEG or PNG image interactive by uploading it to MapsAlive, adding markers to identify hotspot locations on the map, and then publishing the map to make it available to others on the web.
Make any diagram interactive
A diagram becomes much more engaging when you make it interactive with MapsAlive. Click on a sample below to see how an interactive diagram works.


Make any floor plan interactive
Interactive residential floor plans let buyers see a home at a glance: how the rooms are laid out, how big they are, and where windows and doors are located. You can select an arrow marker to see a photo taken from that location. Commercial floor plans for office spaces, trade show floors, or museums can be used for a wide variety of purposes. Click on a sample below to see how an interactive floor plan works.


Make any image interactive
Turn an ordinary photograph into an interactive experience with MapsAlive. The images below are not “maps” in the traditional sense of the word, but they come alive when you add hotspots that display text and other images when you touch or mouse over the points of interest. Click on a sample to see how an interactive image works.


Video: How to make a map interactive
Watch this two-minute video to learn how you use MapsAlive to make a map, diagram, floor plan or other image interactive. See how you upload your map image, create hotspots with photos, choose markers and place them on the map. At the end of the video you’ll see how to preview your tour before publishing it to the web.
Ways to use interactive maps
Use MapsAlive to create a mini website
You can use an interactive map like a mini standalone web site that can be visited without having to be contained in another web site. In MapsAlive parlance, this is called a tour.
Classic house tour with a fixed layout
A standalone tour can have an interactive map plus web page layout features such as a banner, title bar, and footer. Maps used like this work on mobile devices and are responsive. They are an especially good choice when you want to create an interactive map that has the look and behavior of a simple, standalone website.

Flex map house tour using popups
A standalone interactive map does not need to have things like a banner or title bar. It can be just the map and use popups to display information about locations on the map. A tour like this can be used standalone or it can be embedded in another web page. Flex maps are a special feature of MapsAlive that allow the map to use all of the available browser area.

Use interactive maps on mobile devices
MapsAlive automatically switches to mobile mode on small devices and behaves like a mobile app. But because it’s running in a browser, people don’t need to download an app to use the interactive map.

Embed interactive maps within web pages
Maps you make interactive with MapsAlive can be embedded directly within a web page. The MapsAlive User Guide uses this feature so that you can learn about a topic and see it work without leaving the page you are on. Click the screenshot below to see this feature in action.

Use an interactive map within a web application
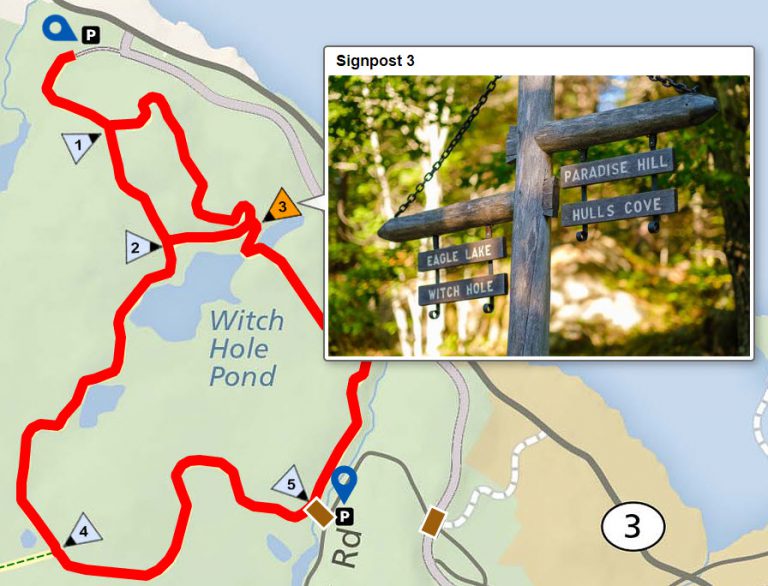
MapsAlive has a powerful API (Application Programming Interface) that programmers can use to make a web application communicate with an interactive map. The screenshot below shows a page from RouteFinder, a web app that finds routes for walking and biking on the carriage roads in Acadia National Park in Maine. When the user clicks a route in the list, the web app’s JavaScript uses the API to draw the route, and to pan and zoom the map, so that the route fills the available screen area.

MapsAlive Features
Responsive
A responsive map automatically adjusts to look its best on whatever device it is displayed on: desktop, tablet, or phone. As you make the browser narrower or wider, the map becomes smaller or larger. With MapsAlive, you don’t need to do anything to make your interactive maps, diagrams, and images responsive because MapsAlive makes them responsive automatically.

Zoomable maps
Zoomable maps engage users and allow them to see more detail. You set how the map is zoomed when it loads so that you can control what users see first. The image below at left shows a map of Bar Harbor, Maine zoomed all the way out. The image below at right shows the center of the map zoomed in with the flag selected on one of hotels to show what it looked like.

Menu and directory navigation
You can navigate between pages in your tour using the built-in MapsAlive menu. The directory feature lets you find hotspot locations by selecting from an alphabetized list or from categorized groups. You can also search for hotspots by title or text.
With the Plus and Pro plans you can create your own categories and assign them to hotspots. Organizing the directory by category makes it easy to find locations of interest on your map. You can assign hotspots to one or more categories like restaurants, lodging, attractions and services, departments, or types of retail stores. Then you can group hotspots by category in the directory. In the example below, the categories are names of towns and villages.

Help Panel
You can provide supplemental information or help content for your interactive maps. This is useful when you want to tell users more about a map or explain how to use it. When you provide help for a page, a help icon (a ? inside a circle) appears next to the page’s name in the menu. The help panel can contain text and image content, and even a video as shown in the example below.

Audio and Video
You can display a video or play audio from an interactive map. Video can be included as a hotspot’s content. Audio can be played in response to a user touching or clicking a marker as in the example below (requires some use of JavaScript). This example shows a help panel with basic instructions that appears automatically when the map first loads.

Hotspots and Markers
A marker indicates the location of a hotspot. A hotspot is an area of the map that you want people to interact with. A hotspot has no size or appearance, but every hotspot has a marker associated with it. Markers define the size, appearance, and behavior of hotspots. MapsAlive comes with ready-to-use markers and you can create your own.
Symbol markers
A symbol marker is a small image, usually an icon, like an arrow, dot, or star, but you can use any image in a symbol marker. Below is an example of a symbol marker that uses a star icon as its image. The star’s normal appearance is gold, but when you mouse over a star, it turns red.

The star turns from gold to red when selected.
Shape markers
A shape marker is a circle, rectangle, polygon, or line that defines the size, shape, color, and transparency of a hotspot. You can define styles for shape markers to control their appearance. The example below shows circle shape markers. The next two sections show examples of polygon and line shape markers.

Hybrid shape markers
A hybrid shape contains two or more shapes to form a single, multi-part shape. When you click or touch one of the parts, the appearance of all the parts becomes highlighted. In the example below, a dozen separate locations in a large museum are all part of the purple colored museum offices shape marker.

Routes
A route is a line drawn on a map through a set of hotspot markers in a connect-the-dots fashion. Routes show a path from one location to another. You can display multiple routes and define the appearance of the routes. You can display routes when a user mouses over or touches a hotspot, or you can show or hide routes dynamically with the MapsAlive API.

The example above shows a route drawn as straight lines through a series of invisible waypoint markers. The example below shows a route drawn as a set of line markers that each have many handles to create curvy lines.
Live Data
MapsAlive has an extremely powerful feature called Live Data that lets your interactive map get information and images from your server in real time. It lets you display up-to-the-minute information that is located on your server instead of within the interactive map itself. The Live Data feature uses standard web technologies that make it easy to communicate with any kind of server to retrieve information in any form you like.

Omeka Classic plugin
Users of Omeka Classic can use their Omeka site as a MapsAlive Live Data server by installing the MapsAlive plugin for Omeka. The MapsAlive plugin lets your Omeka installation act as a MapsAlive Live Data server that provides the interactive map with information from your Omeka database. Click on the screenshot below to see the Omeka plugin in action as it retrieves data in real time from the Southwest Harbor Public Library’s Omeka-based Digital Archive.

The blue arrow shows the Omeka page that appears when you click the link in the popup.
MapsAlive compared to GIS maps like Google and Apple maps
MapsAlive and GIS maps like Google Maps and Apple Maps coexist and compliment each other. GIS maps are excellent when you want to display your markers on a contemporary street map and don’t mind the appearance of other markers such as those for businesses and attractions. There’s a lot you can do with these kinds of maps, and there are many tools for working with them, but ultimately, most GIS maps look more or less the same.
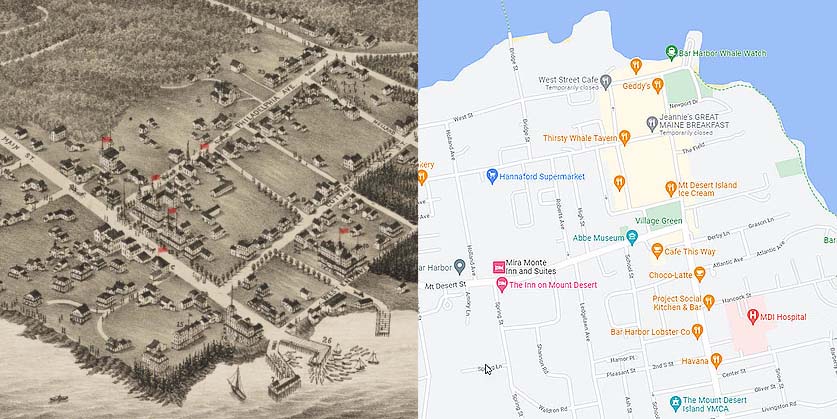
When you want a non-traditional map image such as a floor plan, diagram, photograph, or a stylized or historic geographic map, MapsAlive is an excellent option. To better understand the difference between MapsAlive and GIS maps, compare the two maps below of downtown Bar Harbor, Maine. On the left is a hand-drawn, 3D bird’s eye view and on the right is a Google Map of the same area. Both can be interactive, but with MapsAlive you don’t have to use the same street maps over and over. You can choose any image for a map and it won’t contain advertising or other information that detracts from your interactive content.
MapsAlive is a product of AvantLogic Corporation