Archiving Tours
When you archive a tour you are saving your tour’s maps, images, text content, layout, markers, and behavior in a format that lets you restore the tour to your account at a later date. You can think of an archived tour as a backup.

All MapsAlive plans can import archive files, but you need a Pro Plan to export an archive.
The benefits of archiving tours
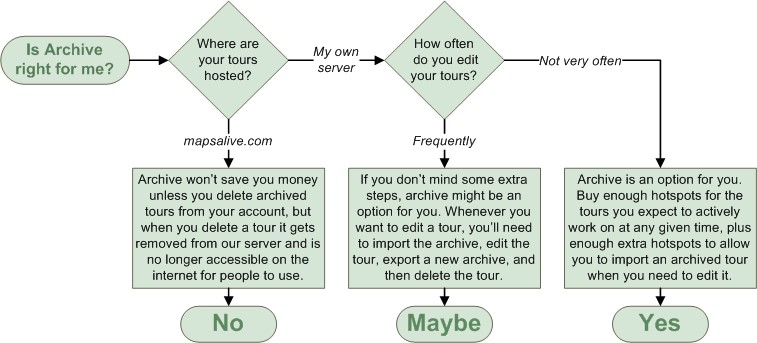
Users that have a lot of tours and hotspots may be able to save money by archiving tours that are not actively being updated. You can then delete the archived tours from your account and free up those hotspots to use for other tours. Thus you can purchase fewer hotspots overall and simply archive and restore tours as you need to work with them.
You can also archive a tour and give the archive file to another MapsAlive user so they can import it into their account. This is an easy way to share examples or create tours that others can use as a template.
You might also want to archive tours that are no longer being used in case you want to use them later. For example, you may have created an interactive floor plan for a house that has been sold, but you want to keep a backup of the tour in case you need to use it again in the future.
Requirements for archiving tours
To take advantage of archiving you must:
- Have a MapsAlive Pro plan
- Be able to host your active published tours on your own server
- Be willing to restore a tour when you need to update it
- Be able to save and manage the archived zip files on your computer
If you plan to archive tours and delete them from your account you must be able to download and host the published tours on your own server.
Once you delete a tour from your MapsAlive account, the published tour is no longer hosted on the MapsAlive server and people will not be able to run it unless it is hosted on your server.
While the process of archiving and restoring tours is not difficult and generally takes only a few minutes, archiving does introduce extra steps for maintaining your tours. When deciding whether to archive you should consider the time and effort required to archive and restore versus the convenience of having all your tours available to update at any time. Determining how many tours you want to be able to update at any one time will help you decide how many hotspots you need in your plan.
Archiving a Tour
You will be prompted to download a zip file containing the archive and for the location on your computer to save the file. Be sure you choose a location that you will remember so you can find your archived tours when you need to restore them.
An archived tour is a zip file containing all the files needed to restore the tour to your account. You save the zip file to a location on your computer. You do not need to extract the files from the zip and you must not modify the zip or its files or you will not be able to restore the tour to your account.
Important: Do not add, remove, or edit any of the files in the archive zip. Doing so can prevent the archive from being imported or cause the archived tour to be restored improperly.
Once you have archived a tour, you can delete it from your MapsAlive account to free up those hotspots. If you are hosting the published tour on your server be sure to download it before deleting it from your account. Once it is deleted you can no longer download it.
How to archive a tour
- Choose Tour > Export from the Tour Builder menu
- On the Export screen:
- Select Archive Tour
- Click OK
- Save the file in a folder on your computer
Restoring a Tour
When you need to restore your tour to your account, you import the zip file that you saved on your computer when you archived the tour. If you import an archived tour with the same name as a tour that is currently in your account, MapsAlive will append a suffix to the tour name to differentiate it from the existing tour in the account. In other words, the restore will not overwrite an existing tour with the same name.
Restoring from a remote location lets you save your archived zip files anywhere on your server.
Once you have restored your tour it is ready to use in your account.
When you restore an archived tour, the restored tour will have a new tour number. There is no way to restore a tour to the original tour number.
If you do not have enough hotspots available in your account to restore a tour, you can still restore it, but you will not be able to publish, download, or archive the tour until you either delete some hotspots or purchase more.
How to restore an archived tour
- Choose Tour > Import > Tour From Archive from the Tour Builder menu
- On the Import Tour From Archive File screen:
- Select In a file on my computer or At a URL on the web
- If restoring from a file, browse for the archive file you want to import
- If restoring from a URL, type the URL for the file on the remote server
- Click the Import button
Tour images
When you archive a tour, the images are saved at the sizes currently used in the tour. The archive does not preserve the original sizes that you uploaded when creating this tour. This means that when you restore the tour, you can make changes to it, but you won’t be able to make the images larger unless you upload the larger original images again.
Archive vs. download
An archived tour is a single zip file containing all the content and data needed to restore it to your account. The zip file is strictly a backup archive file. A downloaded tour is also a zip file, but it contains a folder of files that you can upload to your server in order to host the tour there. When you download a tour you extract the files from the zip before copying them to your server. In both cases, you cannot modify the files that make up the archive or the downloaded tour.