Requesting Hotspot Content
A hotspot request gets content for one hotspot. You can request data for many hotspots at the same time using data requests.
The diagram below depicts how a hotspot request works.
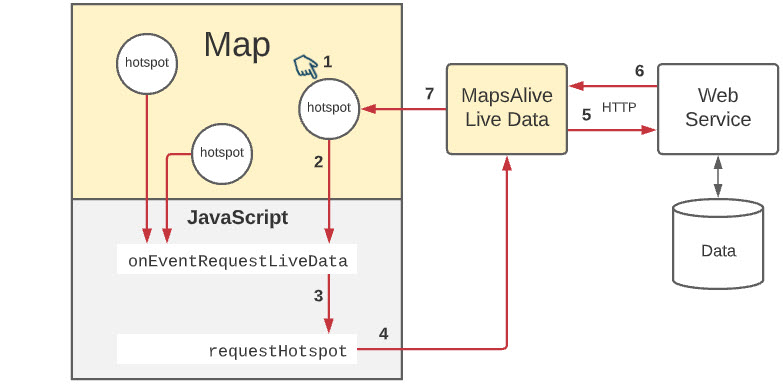
The table below describes each of the steps depicted in the diagram above.
| Step | Action |
|---|---|
| 1 | The user mouses over or taps a Live Data hotspot. |
| 2 | The hotspot automatically calls its request function which by default is onEventRequestLiveData. You code this function in your JavaScript. |
| 3 | The request function calls the liveData.requestHotspot method. In the call, you specify parameters to tell the server which hotspot the request is for. |
| 4 | The liveData.requestHotspot method creates a server request. |
| 5 | Live Data sends the request to the server and listens for a response. While MapsAlive is waiting for a response, it displays a waiting graphic (spinning ball). |
| 6 | The server responds to the request with content for the hotspot. The response can be JSON, XML, or HTML. |
| 7 | Live Data automatically assigns the content to the hotspot. Live Data hides the waiting graphic and displays the content immediately. If the server never responds, Live Data will eventually stop waiting and hide the waiting graphic. |
requestHotspot Method
You make a hotspot request using the liveData.requestHotspot method as shown in the example below. A request results in a response containing hotspot content as will be explained later.
function onEventRequestLiveData(event) {
   let url = "https://livedata.mapsalive.com/php/demo/service.php";
   event.api.liveData.requestHotspot("json", 0, url, "type", "data-json", "row", 6, "count", 3);
}
Live Data Hotspot
A Live Data hotspot is like any other hotspot except that it uses Live Data to get its content automatically via a call to the liveData.requestHotspot method. In fact, you can only use the liveData.requestHotspot method with a Live Data hotspot. Steps 1 and 2 in the diagram above show how it works.
You can make a hotspot use Live Data in one or both of these ways:
- Call the
api.setHotspotUsesLiveDatamethod, or - Set the Uses Live Data option in the Tour Builder
How to set a hotspot to use Live Data in the Tour Builder
- Choose Hotspot > Advanced Hotspot Options from the Tour Builder menu
- On the Advanced Hotspot Options screen:
- Check the Uses Live Data option as shown below

The Uses Live Data option tells MapsAlive to automatically call the hotspot's Live Data request function (explained in the next section) whenever the user mouses over or taps the hotspot's marker.
Request Function
The request function is a JavaScript function that you provide to call the liveData.requestHotspot method.
MapsAlive automatically calls a Live Data hotspot's request function when you mouse over or tap the hotspot's marker as shown in steps 1 and 2 in the diagram above. Every Live Data hotspot can use the same request function, or different automatic hotspots can call different functions. By default, MapsAlive will call onEventRequestLiveData(event) as the request function, but you can specify a different function.
How to specify a Live Data hotspot's Live Data request function
- Choose Hotspot > Advanced Hotspot Options from the Tour Builder menu
- On the Advanced Hotspot Options screen:
- Specify a request function call in the Request Function field as shown below. If you leave the field blank, MapsAlive calls
onEventRequestLiveData(event).
- Specify a request function call in the Request Function field as shown below. If you leave the field blank, MapsAlive calls

Response to a Request
A request for hotspot content that is made by calling the liveData.requestHotspot method can return a response in the following data formats:
- JSON
- XML
- HTML
An important reason for using the JSON or XML formats is that those two formats can return an error response if the server is unable to process the request. When an error occurs, MapsAlive reports information about the error. The HTML format can only return HTML which means there is no way for MapsAlive to know if a server error occurred.
The sections that follow describe each response format.
JSON Response
A JSON response to a liveData.requestHotspot request must be a JSON object with one of the following:
- HTML
- Error
HTML
The JSON object's html property contains HTML that will be used as-is for hotspot content.
Example:
{"html":"<div>This is some hotspot content</div>"}
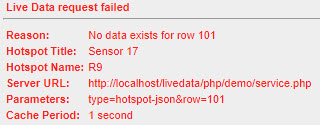
Error
If the JSON object has an error property containing a non-blank error message, MapsAlive will set event.response.error to true and assign the error message to event.response.data.
Example:
{"error":"No data exists for row 101"}
XML Response
An XML response to a liveData.requestHotspot request must be XML with one of the following:
HTML
An <html> node containing HTML that will be used as-is for hotspot content.
Example:
<hotspot>
    <html>
        <![CDATA[<div>This is some hotspot content</div>]]>
    </html>
</hotspot>
Error
If the XML object has an <error> node containing a non-blank error message, MapsAlive will set event.response.error to true and assign the error message to event.response.data.
Example:
<hotspot>
    <error>No data exists for row 101</error>
</hotspot>
In the examples above, the root node is named <hotspot>, but it can be any name you like. For example <root>.
For MapsAlive V3 compatibility, the html node can be named <text> and the error node can be named <serverError>.
HTML Response
HTML:
An HTML response to a liveData.requestHotspot request must be HTML that can be used as-is for hotspot content
Example:
<div>This is some hotspot content</div>
event.response.error to false.
HTML Inside XML
When using HTML inside of XML, the HTML text must be treated so that it will not be interpreted as XML by the XML parser. This is a requirement because characters like < and & are illegal in
XML elements. < will generate an error because the parser interprets it as the start of a new element. & will generate an error because the parser interprets it as the start of a character entity.
To address this issue, use a CDATA section within the XML to tell the XML parser to ignore the characters in that section. CDATA means Character Data. A CDATA section starts with <![CDATA[ and ends with ]]>. The CDATA section should immediately follow its preceding XML tag without a line break.
As an alternative to CDATA, you can convert the offending characters to HTML entities. For example, you can encode < to <. You can encode in C# using the HttpUtility.HtmlEncode method. In PHP you can do it using the htmlspecialchars function. In Python you can use html.escape.
Below are examples of both solutions applied to the text <img src='/images/Chicago.jpg'>
<data id="h1">
    <html><![CDATA[<img src='/images/Chicago.jpg'>]]></html >
</data>
<data id="h1">
<html><img src='/images/Chicago.jpg'></html >
</data>
Note that in the first example above, the CDATA section immediately follows <html> without a line break.
Cache period
To keep things simple, the previous explanations have stated that MapsAlive automatically calls a hotspot's request function when you select the hotspot by mousing over or tapping its marker. That's not entirely accurate because when you call the liveData.requestHotspot method, you specify a cache period. To be accurate, when you select a hotspot, MapsAlive will call the request function only if the cache period has expired, otherwise, MapsAlive will display the content received in response to the most recent request.
The cache period is the number of seconds that must elapse since a previous call to liveData.requestHotspot for a given hotspot. Specify 1 or more seconds for content that could change on your server while someone is viewing the map. Specify 0 if MapsAlive should only call the server once to request a hotspot's content and cache (save) the response, and use the cached content if the user selects that hotspot again while still viewing the map.
You can force the cache period for all hotspots on a map to expire immediately by calling the livedData.flushCache method.
Server errors
A server should validate the request and report an error if it cannot satisfy the request. A server can report an error by responding with one of the following:
- A JSON object with a single error property:
{error:"The error message"} - XML with a single error node:
<error>The error message</error> - A response code such as 500 and an error message
MapsAlive will detect the error. When it calls onEventLiveDataResponse, it will set event.response.error to true, and put the error message in event.response.data.
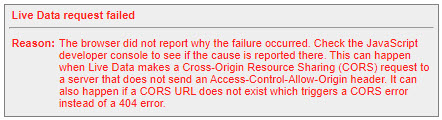
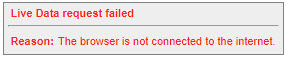
MapsAlive automatically handles errors that occur when using liveData.requestHotspot. When the server receives the request but is unable to satisfy it, it can send back a response that indicates an error has occurred by providing an error message in the response. When an error occurs, MapsAlive will display the error as the hotspot's content. Examples of server errors are shown below.
MapsAlive can also detect some errors that occur if the call to the server failed. These are shown below.

See the Custom Error Messages section to learn how you can customize the appearance of Live Data error messages.