Categories
You can create your own categories like restaurants, lodging, attractions and services, departments, or types of retail stores, and assign your hotspots to one or more categories. Then you can organize your directory by category to help users find locations on your map.
The Categories feature is available with the Plus and Pro Plans.
Working with Categories
To use categories you first add categories to your account and then assign them to your hotspots. When you assign more than one category to a hotspot, that hotspot will appear in each category grouping in the directory.
How to add a new category
- Choose New > Resource > Category from the Tour Builder menu
- On the Edit Cateory screen:
- Choose a category name and code
- Choose Directory Group from the Type dropdown
How to edit a new category
- Choose Library > Categories from the Tour Builder menu
- Click the name of the category you want to edit
How to assign a category to a hotspot
- Choose Hotspot > Advanced Hotspot Options from the Tour Builder menu
- On the Advanced Hotspot Options screen:
- Check the categories in the Categories List. You can choose more than one category for a hotspot.
How to delete a category
- Choose Library > Categories from the Tour Builder menu
- On the Categories Library screen:
- Click the name of the category you want to delete
- Choose Library > Delete from the menu
You cannot delete a category that is used by a hotspot. You can see how many hotspots are using a category on the Category Library screen. Click the Usage Count number to see which hotspots maps are using the category.
How to see all the categories in your MapsAlive account
- Choose Library > Categories from the Tour Builder menu
How to filter categories to see only the ones used by the current tour
- Choose Library > Categories from the Tour Builder menu
- Then, choose Library > Filter Categories from the menu
Uncheck Filter Categories to stop filtering.
Other Ways to Use Categories
Importing categories
If you manage your content with an Excel spreadsheet, CSV, or XML file, you can add categories to your import file to automatically assign hotspots to one or more categories when you import your data. This is also useful if you want to change a hotspot's category. See Importing Content and Advanced Import Features for more information.
Using the JavaScript API
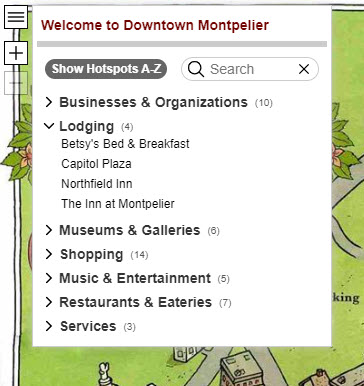
Once you have assigned categories to your hotspots, you can use the getHotspotIdsForCategory method in the JavaScript API to get a list of hotspots that belong to one or more categories. This is useful for creating a map legend or other controls for your web page. For example, you could use the JavaScript API to highlight all the hotspots that have the "Lodging" category.
Image Size Override categories
You can also use categories to define a maximum size for a hotspot popup image that will override the image size defined by the layout. This special kind of category is useful when you have varying sizes of hotspot images, but you want all your popups to be the same size.
Because MapsAlive automatically displays popup images at their uploaded size and aspect ratio (up to the maximum size you have specified on the Popup Size and Appearance screen) your popup sizes may vary. For example, if some of your images are 600 x 400 (landscape) and some are 400 x 600 (portrait), but you want all images to be just 400 wide, set the width dimension on the landscape images to 400 and leave the height blank. The landscape images will then be scaled down to 400 wide (the height will become 267 to preserve the 600 x 400 aspect ratio).
How to create a Hotspot Image Size Override category
- Choose New > Resource > Category from the Tour Builder menu
- On the Edit Cateory screen:
- Choose a category name and code
- Choose Hotspot Image Size Override from the Type dropdown
- Specify the width and height