Shape Markers
A shape marker is a circle, rectangle, polygon, or line that defines the size, shape, color, and transparency of a hotspot. A hybrid shape contains two or more of the other kinds of shapes to form a single, multi-part shape. Here are examples of the five kinds of shape markers: circle, rectangle, line, polygon, and hybrid containing a polygon and a circle shape.

How to create and edit shape and hybrid markers
You can create and edit both shape and hybrid markers using the Map Editor (requires a Plus or Pro Plan). To learn how, see the sections on Creating Shape Markers and Creating Hybrid Markers.
Understanding Shape Markers
Each kind of shape marker has information associated with it that defines the shape itself. A circle shape has a radius. A rectangle shape has a width and height. A polygon shape has a set of coordinates that define its outline. A line shape has a set of coordinates that define its path.
A hybrid shape contains information about each of its parts. On a map that uses a hybrid marker, when you mouse over any one of its parts, all of the parts show the marker’s selected appearance together.
Unlike symbol markers, shape markers have no images associated with them. Instead, they have marker styles that define their appearance.

Shape markers let you highlight areas on your map such as a room on a floor plan or a region on a geographic map. Using marker styles, you can create shape markers that have a solid color or are semi-transparent letting you see through the shape to the map image below. You can even create invisible shape markers. A common technique is to make a shape’s normal appearance invisible and its selected appearance visible so that the shape “lights up” when you move your mouse over it.
By using marker effects, you can add a glow or drop shadow to make markers stand out on the map.
Circles and Rectangles
As an alternative to using the Map Editor, there are other ways to create circle and rectangle shape markers that don't require a Plus or Pro Plan. There are no alternatives for creating polygon, line, and hybrid shapes.
How to create a circle or rectangle shape marker using the Edit Marker screen
- Choose New > Resource > Marker from the Tour Builder menu
- On the Edit Marker screen:
- Give the marker a name
- Choose Shape from the Marker Type dropdown
- Choose Circle or Rectangle from the Shape dropdown
- Choose a marker style from the Marker Style dropdown or click the New link to create a new marker style
- Specify the circle radius or the rectangle dimensions
How to edit a shape marker using the Edit Marker screen
- Choose Library > Markers from the Tour Builder menu
- On the Marker Library screen:
- Click the name of the marker you want to edit
You can also edit the shape marker by clicking the Edit link next to the Marker dropdown on the Edit Hotspot Content screen.
How to use a number, letter, or symbol that is already on my map image as a marker
You can take advantage of numbers, letters, and symbols that are already on your map image by creating a shape marker and then placing it over the number, letter, or symbol on the map in MapsAlive.
- Choose New > Resource > Marker from the Tour Builder menu
- On the Edit Marker screen:
- Choose Shape from the Marker Type dropdown
- Choose Rectangle or Circle from the Shape dropdown. For rectangles, you can set the width and height and for circles, you can set the radius.
- Choose a marker style from the Marker Style dropdown to define the normal and selected marker appearance. To see the map image under the marker, use a marker style that uses blend mode or reduce the opacity. Another option is to use a transparent marker style for the normal marker appearance.
Now you can associate your new marker with a hotspot and place the marker over the number, letter, or symbol on your map image.
To learn more, see Working with Markers.
Importing Marker Shapes
You can import shape coordinates from a file (requires a Plus or Pro Plan) as described in the sections that follow.
This is a legacy feature that is no longer needed because you can create and edit shape and hybrid markers in the Map Editor. It is still supported for users who have shape data in HTML image map format.
How it works
The Import Marker Shapes feature lets you import one or more HTML <area> tags and their shape coordinates and have MapsAlive automatically create a hotspot and a marker for each shape. This saves you from having to add hotspots one at a time.
HTML image maps
To understand how this works, you’ll need some basic familiarity with HTML image maps and <area> tags. An HTML <area> tag is used fo define a clickable area within an image on a web page. It consists of a shape name and a set of coordinates that define the shape.
An <area> tag might look like:
<area shape="poly" alt="CO" title="Colorado"
   coords="444,560,465,403,465,402,612,418,670,423,671,423,670,463,663,582,632,581" />
<area> tag defines the shape of the state of Colorado. The different attributes of the <area> tag that MapsAlive uses are described below.
Understanding Area Tag Attributes
MapsAlive uses the shape, coords, href, alt and title attributes of the <area> tag when creating hotspot markers. The shape and coords attributes are required. You must specify one or both of the alt and title attributes. The href attribute is optional. All other <area> tag attributes are ignored by MapsAlive.
Area tag attributes as used by MapsAlive
| Attribute | Description | Allowed Values | Required |
|---|---|---|---|
| shape | MapsAlive supports the standard shape attributes of circle, rect, or poly (polygon) in area tags as well as a line shape that lets you specify coordinates for a line. | circle, rect, poly, line |
Yes |
| coords | These are the coordinates for the shape. For rectangles, the coordinates specify the top-left and bottom-right corner of the rectangle. For circles, the coordinates specify the circle center and the radius. For polygons and lines, the coordinates specify the edges of the polygons. | Comma separated list of coordinates | Yes |
| alt | If specified, the value of the alt attribute is used as the Hotspot ID and as the Marker Name. |
Plain text | Yes, if title not specified. |
| title | If specified, the value of the title attribute is used as the Hotspot Title. If the alt attribute is not specified, the title attribute is used as the Hotspot ID, the Marker Name, and the Hotspot title. |
Plain text | Yes, if alt not specified. |
| href | The value of the href attribute is used to specify the URL for a hotspot that is clickable. |
A URL | No |
Import Marker Shape Options
You can import any HTML file (.htm or .html) containing <area> tags. MapsAlive only uses the <area> tags in your file and ignores all other HTML tags in the file.
When you import marker shapes you can select a marker style to use for the appearance of the markers you import. The color, opacity, and line thickness of the marker style you choose will be used for the markers MapsAlive creates from your imported coordinates.
Each new marker created during an import gets the same appearance. Before importing Marker Shapes, choose a marker style from the Marker Style dropdown list on the import page. You can change a marker’s appearance later, but choosing an appropriate marker style now will save you time.
How to import marker shapes
- In the Tour Navigator choose the map that you want to import shapes
- Choose Tour > Import > Marker Shapes from the Tour Builder menu
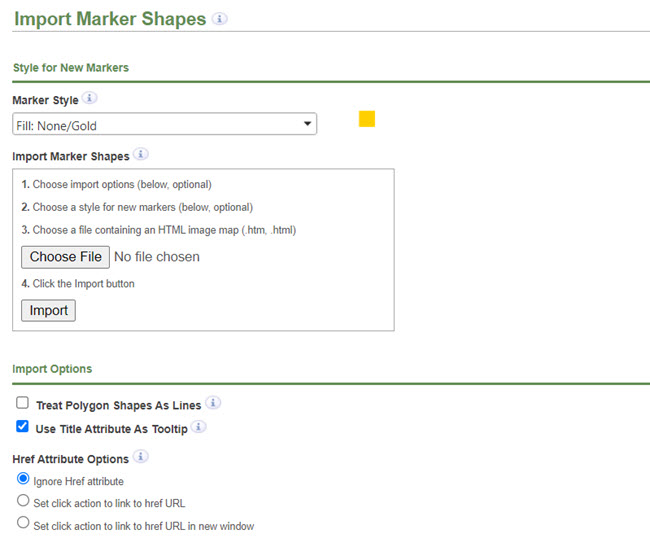
- On the Import Marker Shapes screen:
- Select a marker style from the Marker Style dropdown
- Click Choose File and browse for the file on your computer that contains your marker shape definitions
- Click Import
Several import options on the Import Marker Shapes screen give you even more control over how your shape markers are created.
Options
- Treat Polygon Shapes as Lines
- MapsAlive supports the standard shape attributes of circle, square, or poly (polygon) in
<area>tags as well as a line shape that lets you specify coordinates for a line. You can include the shape=”line” attribute within your<area>tags or you can check the Treat Polygon Shapes As Lines checkbox and MapsAlive will automatically treat any polygon shapes as lines by ignoring the last line segment in the coordinates. - Use Title Attribute As Tooltip
- If you check Use Title Attribute As Tooltip, the tooltip associated with the hotspot will be set to the value of the
titleattribute, if any. This lets you automatically create tooltips for your hotspots. - Ignore Href attribute
- Some programs that generate
<area>tags add thehrefattribute automatically, but if you do not want your hotspots to be clickable you can tell MapsAlive to ignore this attribute. - Set click action to link to href URL
- If you include the
hrefattribute as part of your<area>tags, MapsAlive can automatically set the Click Action for the marker to Link to URL and the marker’s URL to the value of thehrefattribute. This lets you automatically define clickable markers and set their target URLs. - Set click action to link to href URL in new window
- This option is the same as the previous one, but lets you select whether the URL replaces the page content or opens in a new window on click.
Updating Marker Shapes
You can use the Import Marker Shapes feature to quickly update the coordinates for markers that already exist. If an existing marker has the same name as the alt attribute of an imported <area> tag, MapsAlive will replace the existing marker's coordinates with the imported coordinates.
Combining Multiple Areas into One Marker
You can create markers that are made up of discrete areas such as the islands of the state of Hawaii, or separate rooms on a floor plan. These are called hybrid markers. To combine more than one polygon shape into one marker, simply use the same value for the alt attribute for each of the areas.
Tips and Techniques
Some marker styles work better than others, especially when using maps where the shapes are adjacent to each other (versus maps where the shapes don’t butt up against each other). Adjacent shapes work well with styles without a border. If the underlying map shapes have their own color, a style with an invisible normal appearance is good. Some amount of experimenting is usually needed to get the best combination of marker style for the specific map background.